

In this tutorial, you will learn how to use TypingDNA Verify 2FA to secure a CRUD application.
This application was built with Vue, Quasar, Express, and TypingDNA Verify 2FA. It is a single-page application that has the following views: VerifyView, HomeView.
The VerifyView is where you will use TypingDNA Verify to verify the user’s typing pattern before granting them access to the HomeView.
The HomeView is where you will allow the users to perform CRUD operations on a table named Persons. Each row on this table will hold a person’s name, gender and photo.
At the end of this tutorial, your application will look like the following:
Prerequisites
To follow this tutorial you will need the following:
Node.js,NPM,NgrokandWgetinstalled on your machine- A TypingDNA account – Don’t have one already? Sign up here
- An
Ngrokaccount and aNgrok authtoken
Table of contents
- Creating the Project Root Directory
- Creating a new TypingDNA Verify 2FA integration
- Creating the server application
- Configuring the client application
- Creating the store
- Creating the client application layout
- Handling the application routing
- Creating the
VerifyView - Creating the
HomeView - Building the client application to production and starting the server
Creating the Project Root Directory
In this section, you will create your project’s directory structure. Then, you will initialize a Node.js project and install the Node modules for your client and server applications.
Open a new terminal window and create a new directory named typingDNA-Verify and navigate into it:
mkdir typingDNA-Verify
cd typingDNA-Verify
Inside this directory create two subdirectories named client and server:
mkdir client serverNavigate into the client directory:
cd clientCreate a build-tool-enabled Vue 3 project:
npm init vue@latest .This command will install and execute create-vue, the official Vue project scaffolding tool. You will be presented with prompts for a number of optional features such as TypeScript and testing support. Answer each prompt like it was below:
✅ Package name: … client
✅ Add TypeScript? … No
✅ Add JSX Support? … No
✅ Add Vue Router for Single Page Application development? Yes
✅ Add Pinia for state management? … Yes
✅ Add Vitest for Unit Testing? … No
✅ Add Cypress for both Unit and End-to-End testing? … No
✅ Add ESLint for code quality? … Yes
✅ Add Prettier for code formatting? … Yes
Install the node modules that came with the scaffolded project :
npm installInstall the following extra node modules that you need to build your client application:
npm install axios uuid @vueuse/coreWith the command above you installed the following node modules that you are going to use in your project:
axios: is a promise-based HTTP client for the browser and node.js. You are going to use this module to communicate with your server.uuid: is a module that allows you to generate RFC-compliant UUIDs in JavaScript. You are going to use this module to create an id for each person that you want to add to the persons table.vueUseis a collection of essential Vue Composition utilities for Vue 2 and 3. You will use this module to persist the application state.
Install the quasar framework :
npm install quasar @quasar/extras
npm install -D @quasar/vite-plugin sass@1.32.0
quasar is a framework that allows you to build high-performance Vue.js user interfaces in record time. You are going to use this framework to build the user interface for your client application.
Now that you have initialized a node project and installed the node modules for the client applications, go ahead and do the same for the server application.
Navigate to the server directory:
cd ../serverInitialize a new node project with the default settings:
npm init -yInstall the node modules that you need to build your server application:
npm i typingdna-verify-client express cors dotenv connect-history-api-fallback With the command above you installed the following node modules that you are going to use in your project:
typingdna-verify-client: is a module that allows you to communicate with the TypingDNA API.express: is a fast, unopinionated, minimalist web framework for node.js that allows you to create web Servers. You will use this module to create a server for our application and to interact with TypingDNA.cors: is a node.js package for providing a Connect/Express middleware that can be used to enable CORS with various options.dotenv: is a zero-dependency module that loads environment variables from a.envfile intoprocess.env. You will use this module to retrieve TypingDNA credentials stored in a.envfile.connect-history-api-fallback: is a middleware to proxy requests through a specified index page, useful for single-page applications that utilize the HTML5 History API.
Create a .env file in this directory and leave it empty for now.
Creating a new TypingDNA Verify 2FA integration
In this section, you will create a new TypingDNA Verify 2FA integration in your TypingDNA account and then copy and store your account’s credentials in the .env file that you created in the previous section.
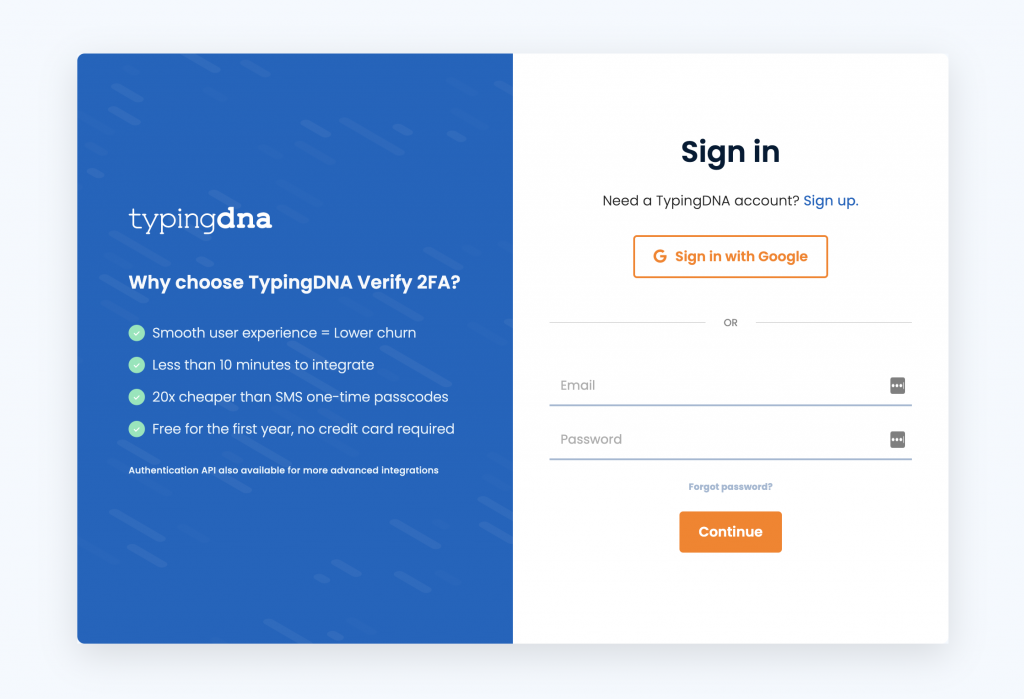
Open your preferred browser, navigate to TypingDNA’s sign-in page, and then sign in to your account.
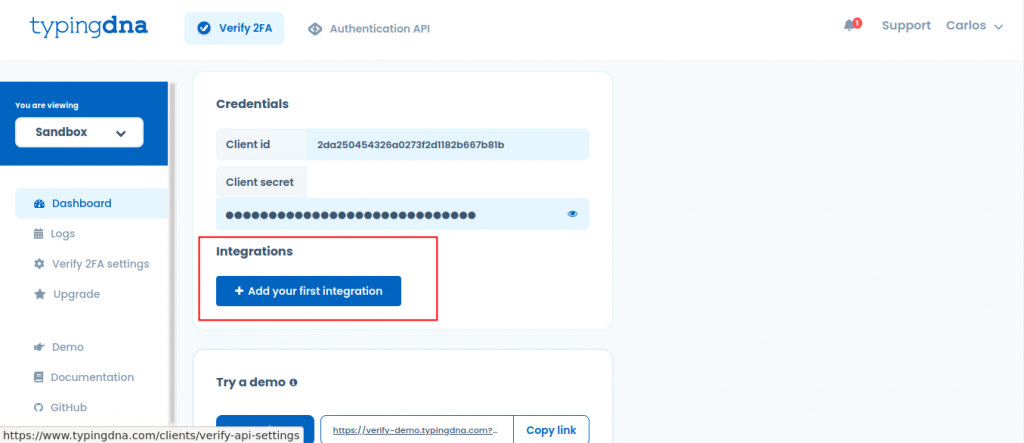
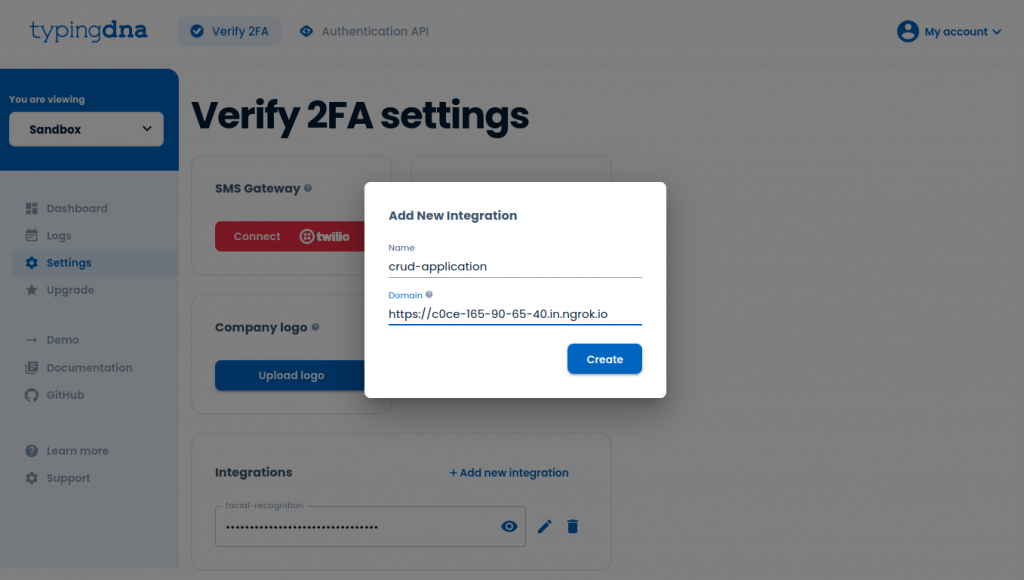
Click on the button where it says “Verify 2FA” to switch to the Verify Dashboard. In the “Integrations” section click the “Add your first integration” button if you haven’t created an integration before or the “Manage” button and then the “Add integration” button if you have.
You will be asked to enter a name and a domain for your integration, so before you do that, you will have to use Ngrok to generate a disposable domain.
Open a second terminal window and install your Ngrok account authtoken if you haven’t already:
ngrok authtoken <YOUR_AUTHTOKEN>Expose a web server on port 4000 of your local machine to the internet:
ngrok http 4000Please note that you haven’t created a web server yet. You are running Ngrok beforehand because you need to enter a domain in the TypingDNA dashboard to create a new integration.
After running the command you should see the following output in the terminal:
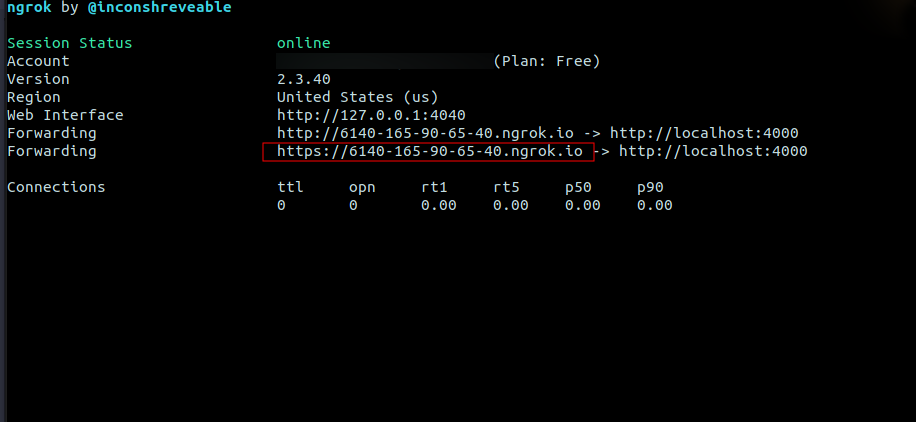
Copy the https URL without https://, go back to your browser and paste it in the “domain” field, in the “Integration name” field enter crud-application and then click the “Create” button.
Copy the Client id, Client secret and crud-application integration (or application) id to the .env file as follows:
CLIENT_ID="YOUR_CLIENT_ID"
CLIENT_SECRET="YOUR_CLIENT_SECRET"
APPLICATION_ID="YOUR_CRUD_APPLICATION_ID"
Creating the server application
In this section, you will create the server application. The server will be responsible for serving the client application and communicating with the TypingDNA API.
Still in the server directory, create a file named server.js and add the following code to it:
let express = require('express')
let cors = require('cors')
var history = require('connect-history-api-fallback');
require('dotenv').config()
const typingDnaVerifyClient = require("typingdna-verify-client");
Here, you required the modules that you are going to use to build the server application:
express: will be used to create a web server that serves the client application and communicates with the TypingDNA API.cors: will be able to enable cors in the web server.connect-history-api-fallback: will be used to proxy requests made by our Vue-built client application.dotenv: will be used to load the TypingDNA credentials stored in the.envfile toprocess.env.typingdna-verify-clientwill be used to communicate with the TypingDNA API to verify the users’ typing patterns.
Add the following code to the bottom of your server.js file:
let app = express()
let port = 4000
const path = __dirname + '/dist/';


app.use(cors())
app.use(history());
app.use(express.urlencoded({ extended: true }))
app.use(express.json())
app.use(express.static(path));
In the code above, you instantiated an express application and stored it in a variable named app.
After instantiating the express application, you set the port to 4000 and stored it in a variable named port.
After setting the port, you store in a variable named path the path for the client application bundle. Please note that you haven’t created the client application yet.
Lastly, you bound all application-level middle-ware to an instance of the app object by using the app.use() method.
Add the following code to the bottom of the server.js file:
const typingDNAVerifyClient = new typingDnaVerifyClient({
    clientId: process.env.CLIENT_ID,
    applicationId: process.env.APPLICATION_ID,
    secret: process.env.CLIENT_SECRET
})
Here, you instantiated a TypingDNA Verify client by passing your TypingDNA credentials and storing the object returned in a variable named typingDNAVerifyClient.
Add the following code bellow the typingDNAVerifyClient object:
app.get("/verifyAccount", (req, res) => {
    console.log('verify request received', req.query)
    let email = req.query.email

    const typingDnaDataAttributes = typingDNAVerifyClient.getDataAttributes({
        email: email,
        language: "EN",
        mode: "standard"
    });

    console.log("typingDNA Atributes: ", typingDnaDataAttributes)

    res.json(typingDnaDataAttributes)
});
In the block of code above, you created the /verifyAccount endpoint. This endpoint will be responsible for receiving end-user data, encrypting it, and returning it to the client.
First, you received the user email and stored it in a variable named email.
After storing the email, you called the getDataAttributes() method, passed to it the email, and stored the object returned in a variable named typingDnaDataAttributes. This method retrieves the required data attributes for the TypingDNA Verify Popup. The language and mode fields passed are optional parameters, defaulting to ‘EN’ and ‘standard’ respectively.
Lastly, you returned the typingDnaDataAttributes to the client.
Add the following code below the /verifyAccount endpoint:
app.post("/validateOTP", async (req, res) => {
    console.log('validateOTP request received',req.body.data)
    let email = req.body.data.email
    let otp = req.body.data.otp
    const validatedOTP = await typingDNAVerifyClient.validateOTP({ email }, otp)
    console.log('validated OTP: ', validatedOTP)

    res.json({ validatedOTP: validatedOTP })
});
Here, you created the /validateOTP endpoint. This endpoint is responsible for validating the OTP the user has submitted. It will be called to verify the user typing pattern.
First, you stored the email and OTP sent by the client in variables named email and otp respectively.
After storing the email and OTP, you called the validateOTP() method, passed to it as arguments the email and otp, and stored the object returned in a variable named validatedOTP. This method calls the TypingDNA code validation service and returns either a success or a failure. Upon a successful code validation, the end-user is considered verified. Lastly, you return the validatedOTP to the client.
Add the following code below the /validateOTP endpoint:
app.listen(port, function () {
    console.log(`CORS-enabled web server listening on port ${port}`)
})
In the code above, you used the app.listen() method to make the server start listening for connections on port 4000. Once the server starts listening it will output a message.
Your server.js file should look like the following:
let express = require('express')
let cors = require('cors')
var history = require('connect-history-api-fallback');
require('dotenv').config()
const typingDnaVerifyClient = require("typingdna-verify-client");


let app = express()
let port = 4000
const path = __dirname + '/dist/';


app.use(cors())
app.use(history());
app.use(express.urlencoded({ extended: true }))
app.use(express.json())
app.use(express.static(path));


const typingDNAVerifyClient = new typingDnaVerifyClient({
    clientId: process.env.CLIENT_ID,
    applicationId: process.env.APPLICATION_ID,
    secret: process.env.CLIENT_SECRET
})


app.get("/verifyAccount", (req, res) => {
    console.log('verify request received', req.query)
    let email = req.query.email

    const typingDnaDataAttributes = typingDNAVerifyClient.getDataAttributes({
        email: email,
        language: "EN",
        mode: "standard"
    });

    console.log("typingDNA Atributes: ", typingDnaDataAttributes)

    res.json(typingDnaDataAttributes)
});


app.post("/validateOTP", async (req, res) => {
    console.log('validateOTP request received',req.body.data)
    let email = req.body.data.email
    let otp = req.body.data.otp
    const validatedOTP = await typingDNAVerifyClient.validateOTP({ email }, otp)
    console.log('validated OTP: ', validatedOTP)

    res.json({ validatedOTP: validatedOTP })
});


app.listen(port, function () {
    console.log(`CORS-enabled web server listening on port ${port}`)
})
Configuring the client application
In this section, first, you will add the typingDNAVerify module to the client application. Lastly, you will configure the Quasar module.
Adding the typingDNAVerify module
Go back to your first terminal window, and navigate to the client directory:
cd ../clientOpen the index.html file and replace contents of the title tag with “CRUD App”. Then, add the following script tag inside the body tag before the main.js script tag:
<script src="https://cdn.typingdna.com/verify/typingdna-verify.js"></script>With the lines above, you have added the typingDNAVerify module to the client application.
Your index.html file should look like the following:
<!DOCTYPE html>
<html lang="en">
<head>
  <meta charset="UTF-8" />
  <link rel="icon" href="/favicon.ico" />
  <meta name="viewport" content="width=device-width, initial-scale=1.0" />
  <title>CRUD App</title>
</head>
<body>
  <div id="app"></div>
  <script src="https://cdn.typingdna.com/verify/typingdna-verify.js"></script>
  <script type="module" src="/src/main.js"></script>
</body>
</html>
Configuring the Quasar module
Go back to the root directory of your client application:
cd ../..Replace the contents of the vite.config.js file with the following:
import { fileURLToPath, URL } from 'url'

import { defineConfig } from 'vite'
import vue from '@vitejs/plugin-vue'

import { quasar, transformAssetUrls } from '@quasar/vite-plugin'


export default defineConfig({
  plugins: [
    vue({
      template: { transformAssetUrls }
    }),
    quasar({
      sassVariables: 'src/quasar-variables.sass'
    })
  ],
  resolve: {
    alias: {
      '@': fileURLToPath(new URL('./src', import.meta.url))
    }
  }
})
In the code above you added the Quasar module to the vite.config.js and made the changes needed to be able to use this module.
Navigate to the src directory:
cd srcCreate a file named quasar-variables.sass and add the following code to it:
$primary   : #1976D2
$secondary : #26A69A
$accent    : #9C27B0

$dark      : #1D1D1D

$positive  : #21BA45
$negative  : #C10015
$info      : #31CCEC
$warning   : #F2C037
In the code above, you are setting the default colors for some quasar variables.
Now, open the the main.js file, and the following code to the import statements:
import { Quasar,Notify } from 'quasar'
import '@quasar/extras/material-icons/material-icons.css'
import 'quasar/src/css/index.sass'
Here, first, you imported the Quasar and Notify object from the Quasar module. The Quasar object is what will allow you to use the Quasar module to build your user interface. The Notify object is a plugin that allows you to display notifications to users.
After importing the objects mentioned above, you imported the icon library that this module uses.
Lastly, you imported this module’s CSS.
Add the following code below the app.use(router) line:
app.use(Quasar, {
    plugins: { Notify },
})
In the code above, you used the app.use() method to add the Quasar module to your application, alongside the Notify plugin.
Your main.js file should look like the following:
import { createApp } from 'vue'
import { createPinia } from 'pinia'

import App from './App.vue'
import router from './router'

import { Quasar,Notify } from 'quasar'
import '@quasar/extras/material-icons/material-icons.css'
import 'quasar/src/css/index.sass'


const app = createApp(App)

app.use(createPinia())
app.use(router)
app.use(Quasar, {
    plugins: { Notify },
})


app.mount('#app')
Creating the store
In this section, you will create the store for your client application. Your application store will then be divided into the following two modules :
typingPattern: you will use this module to check whether the user typing pattern is verified or not. If the typing pattern is verified the user will be allowed to navigate to theHomeView; otherwise he won’t be allowed.persons: you will use this module as a database for your CRUD app.
Go back to your first terminal window, and navigate to the stores directory:
cd storesCreate a file named typingPattern.js and add the following code to it:
import { defineStore } from 'pinia'
import { useStorage } from '@vueuse/core'
Here, first, you imported the defineStore object from the pinia module. This object allows you to define a new store instance and retrieve it.
Lastly, you imported the useStorage object from the vueUse module. This object will allow you to persist your application state across browser sessions.
Now, add the following code below the import statements:
export const useTypingPatternStore = defineStore({
  id: 'typingPattern',
  state: () => ({
    isVerified: useStorage('isVerified', false),
  }),
  actions: {
    verify() {
      this.isVerified = this.isVerified ? false : true
    }
  }
})
In the code above, first, you created the state for this store module. In the state you defined a property named isVerified that will hold a boolean value which will be used to keep track of the user typing pattern verification status. Then you used the useStorage function to persist the state.
Lastly, you created the actions for this store module. This store’s actions only consist of a function named verify. The verify() function changes the isVerified property value to true or false depending on its current value. If the isVerified current value is true it changes it to false and if is false it changes it to true.
Your typingPattern.js file should look like the following:
import { defineStore } from 'pinia'
import { useStorage } from '@vueuse/core'

export const useTypingPatternStore = defineStore({
  id: 'typingPattern',
  state: () => ({
    isVerified: useStorage('isVerified', false),
  }),
  actions: {
    verify() {
      this.isVerified = this.isVerified ? false : true
    }
  }
})
Create a file named persons.js and add the following code to it:
import { defineStore } from 'pinia'
import { useStorage } from '@vueuse/core'
Here, you also imported the defineStore and useStorage objects.
Add the following code below the import statements:
export const usePersonsStore = defineStore({
  id: 'persons',
  state: () => ({
    persons: useStorage('persons', [])
  }),
  actions: {
    addPerson(person) {
      this.persons.push(person)
    },
    editPerson(person) {
      for (let i = 0; i < this.persons.length; i++) {
        if (this.persons[i].id === person.id) {
          this.persons[i] = Object.assign({}, person)
          break
        }
      }
    },
    removePerson(id) {
      let index = 0
      for (let i = 0; i < this.persons.length; i++) {
        if (this.persons[i].id === id) {
          index = i
          break
        }
      }
      this.persons.splice(index, 1)
    },
  }
})
In the block of code above, first, you created the state for this store module. In the state, you defined a property named persons that will hold an array of persons. Then you used the useStorage function to persist the state.
After creating the state, you created the following actions for this store module:
addPerson: this function adds a new person to thepersonsarray.editPerson: this function edits a person’s details.removePerson: this function removes a person from thepersonsarray.
Your persons.js file should look like the following:
import { defineStore } from 'pinia'
import { useStorage } from '@vueuse/core'

export const usePersonsStore = defineStore({
  id: 'persons',
  state: () => ({
    persons: useStorage('persons', [])
  }),
  actions: {
    addPerson(person) {
      this.persons.push(person)
    },
    editPerson(person) {
      for (let i = 0; i < this.persons.length; i++) {
        if (this.persons[i].id === person.id) {
          this.persons[i] = Object.assign({}, person)
          break
        }
      }
    },
    removePerson(id) {
      let index = 0
      for (let i = 0; i < this.persons.length; i++) {
        if (this.persons[i].id === id) {
          index = i
          break
        }
      }
      this.persons.splice(index, 1)
    },
  }
})
Creating the client application layout
In this section, you will create your client application layout. Almost every page of your application will have a navigation bar except the verify page.
Go back to your first terminal window, and navigate to the src directory:
cd ..Open your App.vue file and replace the contents of the template with the following :
<template>
  <div>
    <q-layout  container style="height: 100vh" class="">
      <q-header elevated v-if="typingPattern.isVerified">
        <q-bar class="bg-white">
          <q-space />
          <RouterLink
            to="/"
            class="text-primary q-ml-md navItem"
            >Home
          </RouterLink>
          <RouterLink
            to="/verify"
            class="text-red q-ml-md navItem"
            @click="logout"
            >Log out
          </RouterLink>
        </q-bar>
      </q-header>
      <q-page-container>
        <RouterView />
      </q-page-container>
    </q-layout>
  </div>
</template>
In the HTML code above, you created a navigation bar that will only render if the user’s typing pattern is verified. Please note that every component that has q- is a component provided by the Quasar framework.
Inside this navigation bar, you used the RouterLink component instead of a regular a tag to allow the user to navigate to the /home, and /verify routes.
Below the navigation bar, you created a page container where you will render the HomeView and VerifyView in the RouterView component.
Now, replace the contents of the script tag with the following:
<script setup>
import { RouterLink, RouterView } from "vue-router";
import { useTypingPatternStore } from "@/stores/typingPattern";

let typingPattern = useTypingPatternStore();

function logout() {
  console.log("logout");
  typingPattern.verify();
}
</script>
Here, first, you imported the RouterLink and RouterView components from Vue Router.
After importing the components mentioned above, you imported the useTypingPatternStore object from the typingPattern store module to check if the user is verified or not. Then you stored this store’s state in a variable named typingPattern. This is the variable being used to conditionally render the navigation bar.
Lastly, you created a function named logout(). Once this function is called it will change the typingPattern store module isVerified state to false, and redirect the user to the /verify route.
Replace the contents of your style tag with the following:
<style scoped>
.navItem {
  text-decoration: none;
  font-size: 11pt;
}
</style>
In the code above, you created a class that is being used to override the RouterLink component default style.
Your App.vue file should look like the following:
<template>
  <div>
    <q-layout  container style="height: 100vh" class="">
      <q-header elevated v-if="typingPattern.isVerified">
        <q-bar class="bg-white">
          <q-space />
          <RouterLink
            to="/"
            class="text-primary q-ml-md navItem"
            >Home
          </RouterLink>
          <RouterLink
            to="/verify"
            class="text-red q-ml-md navItem"
            @click="logout"
            >Log out
          </RouterLink>
        </q-bar>
      </q-header>
      <q-page-container>
        <RouterView />
      </q-page-container>
    </q-layout>
  </div>
</template>


<script setup>
import { RouterLink, RouterView } from "vue-router";
import { useTypingPatternStore } from "@/stores/typingPattern";

let typingPattern = useTypingPatternStore();

function logout() {
  console.log("logout");
  typingPattern.verify();
}
</script>


<style scoped>
.navItem {
  text-decoration: none;
  font-size: 11pt;
}
</style>
Handling the application routing
In this section, you will set your client application routing with the help of Vue Router. Go back to your first terminal window, and navigate to the router directory:
cd routerOpen the index.js file in the directory and add the following code to the import statements:
import VerifyView from '../views/VerifyView.vue'
import { useTypingPatternStore } from "@/stores/typingPattern";
In the block of code above, first, you imported VerifyView. The HomeView has already been imported.
The HomeView will be where you will perform CRUD operations on the list of persons stored in the persons store.
The VerifyView will be where you use TypingDNA Verify to verify the user’s typing pattern before granting him access to the HomeView.
Lastly, you imported the typingPattern store to access its state and check if the user is verified or not.
Replace the routes property of your router object with the following :
routes: [
    {
      path: '/',
      name: 'Home',
      component: HomeView
    },
    {
      path: '/verify',
      name: 'Verify',
      component: VerifyView
    }
  ]
Here, you removed the /about route and then added the /verify route to your client application’s routes list.
Add the following code below your router object :
router.beforeEach(async (to, from) => {
  const typingPattern = useTypingPatternStore()
  console.log('verify state: ', typingPattern.isVerified)

  if (!typingPattern.isVerified && to.name !== 'Verify') {
    return { name: 'Verify' }
  }
})
In the code above, you added functionality that will allow you to check if the user’s typing pattern is verified before navigating to any route. If the user’s typing pattern is verified he will be able to navigate to this route if not he will be redirected to the /verify route.
Your index.js file should look like the following :
import { createRouter, createWebHistory } from 'vue-router'
import HomeView from '../views/HomeView.vue'
import VerifyView from '../views/VerifyView.vue'
import { useTypingPatternStore } from "@/stores/typingPattern";
const router = createRouter({
  history: createWebHistory(import.meta.env.BASE_URL),
  routes: [
    {
      path: '/',
      name: 'Home',
      component: HomeView
    },
    {
      path: '/verify',
      name: 'Verify',
      component: VerifyView
    }
  ]
})
router.beforeEach(async (to, from) => {
  const typingPattern = useTypingPatternStore()
  console.log('verify state: ', typingPattern.isVerified)
  if (!typingPattern.isVerified && to.name !== 'Verify') {
    return { name: 'Verify' }
  }
})
export default router
Creating the VerifyView
In this section, you will create the VerifyView. This view will be where the user will input his email account and then use TypingDNA Verify 2FA to verify his typing pattern.
Go back to your first terminal window, navigate to the views directory:
cd ../viewsCreate a file named VerifyView.vue and add the following code:
<template>
<main class="flex justify-center fixed-center">
<div>
<q-card v-show="!addedEmail" style="width: 50vw; height: 50vh">
<div class="q-pt-xl" style="">
<q-form @submit="addEmail" class="q-mx-lg">
<p class="text-h6 text-primary">
Enter your email to verify that you are an actual human
</p>
<q-input
filled
class=""
v-model="email"
label="Enter your email"
lazy-rules
:rules="[
(val) => (val && val.length > 0) || 'Please type something',
(val) =>
(val && val.includes('@')) || 'Please type a valid email',
]"
/>
<div>
<q-btn
:loading="btnSaving"
label="Save"
type="submit"
color="primary"
>
<template v-slot:loading>
<q-spinner-hourglass />
</template>
</q-btn>
</div>
</q-form>
</div>
</q-card>
</div>
</main>
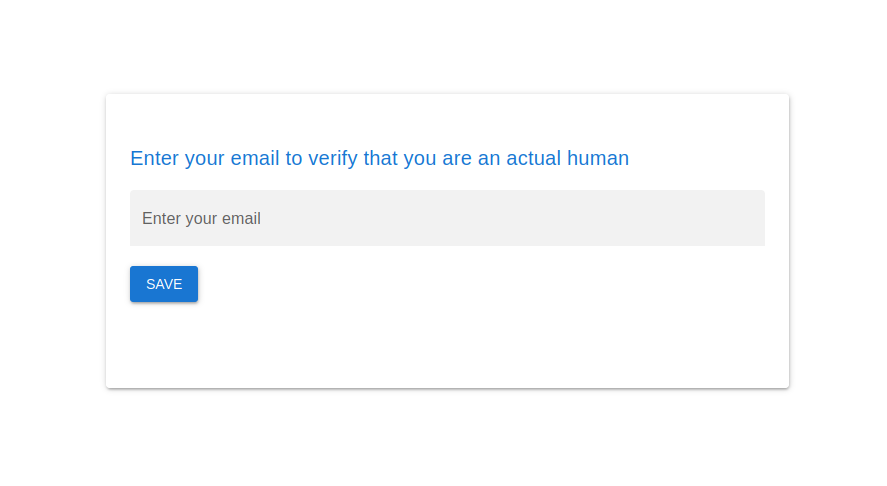
</template>In the block of code above, you added the template tag of your VerifyView. Inside this tag, you created a card that will only render if the user hasn’t added his email yet. This card contains a form, where the user will input his email address to verify his account.
Once the form is submitted a function named addEmail will be called. This function will send the user email to the server’s /verifyAccount endpoint to get the TypingDNA data attributes needed to create a button that will allow you to verify the user’s typing pattern.
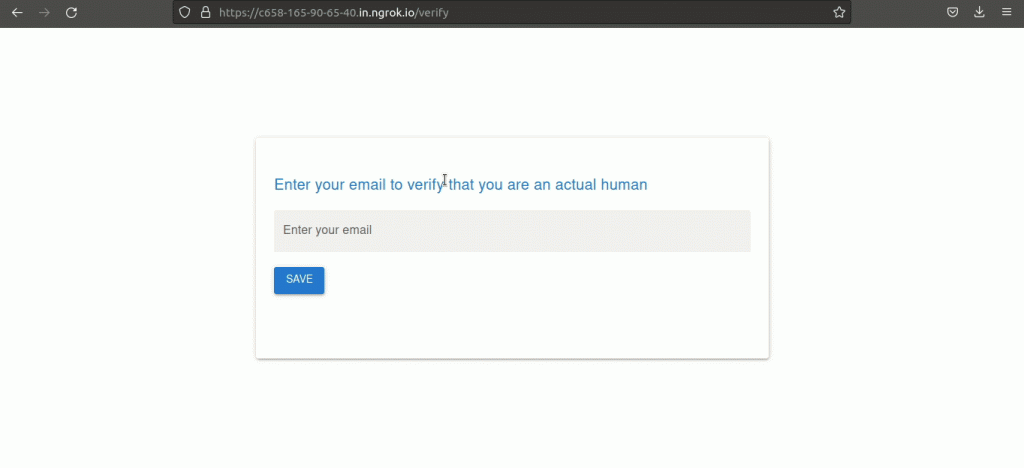
The card created above should look like the following:
Add the following code bellow the card you create above:
<template>
<main class="flex justify-center fixed-center">
<div>
. . .
<q-card v-show="addedEmail" style="width: 50vw; height: 50vh">
<div class="justify-center fixed-center" style="">
<q-btn
class="typingDNA-verify"
color="primary"
:data-typingdna-client-id="typingDNADataAttributes.clientId"
:data-typingdna-application-id="
typingDNADataAttributes.applicationId
"
:data-typingdna-payload="typingDNADataAttributes.payload"
data-typingdna-callback-fn="typeDNACbFn"
>
Verify 2FA with TypingDNA
</q-btn>
</div>
</q-card>
</div>
</main>
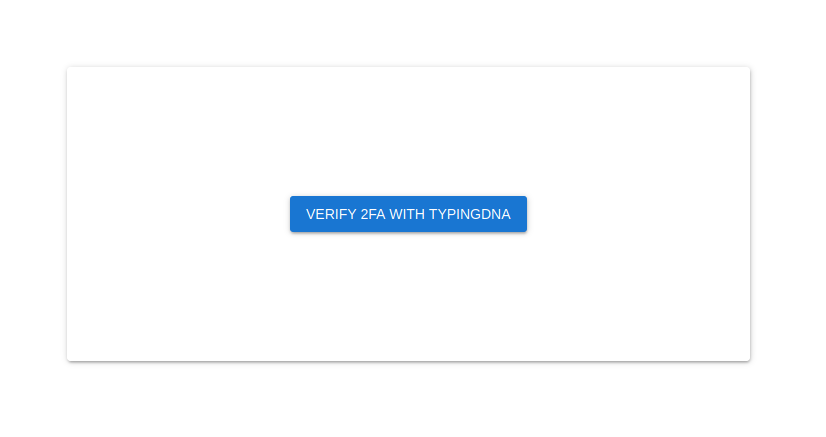
</template>Here, you added a card that will only render if the user has added his email address. This card contains a button that has the TypingDNA data attributes retrieved when you submitted the form on the first card.
A popup window will open when this button is clicked, and in this window, you will use TypingDNA Verify to verify the user’s typing pattern.
Once the typing pattern is verified, a callback function named typeDNACbFn will be called to verify the OTP. This function will send the user email and OTP to the server’s /validateOTP endpoint to validate the OTP. If the OTP is successfully validated the user will be considered verified.
The card created above should look like the following:
Add the following script below your template tag:
<script>In the block of code above, you added the script tag of your VerifyView. Inside this script tag, first, you imported the axios module, the typingPattern store module, the router from Vue Router, and the useQuasar function.
After the import statements, you created the data field where you are storing an object containing the data used to render the page elements, retrieve and store the TypingDNA data attributes retrieved from the server, and validate the OTP.
Lastly, you added the created hook that will call a method named initialize() once this component is created.
Add the following code below the created hook:
setup() {
  const $q = useQuasar();
  const typingPattern = useTypingPatternStore();
  return {
    showNotification(message, color) {
      $q.notify({
        message: message,
        color: color,
      });
    },
    typingPattern
  };
},
methods: {
  initialize() {
    window.typeDNACbFn = this.typeDNACbFn;
  }
}
Here, you added the setup hook. Inside this hook, first, you used the useQuasar function to access the Quasar notify plugin and create a function named showNotification that you can use to show notifications to the user. Then you made the typingPattern store accessible in this component.
After adding the setup hook, you added the methods field where you created a method named initialize. The initialize() method is responsible for adding a method named typeDNACbFn() to the window object. You need to add the typeDNACbFn() method to window object because this is where the TypingDNA client searches for the callback function.
Add the following code below the initialize() method:
addEmail() {
  axios
    .get(`${this.URL}/verifyAccount?email=${this.email}`)
    .then((res) => {
      console.log("axios", res.data);
      this.typingDNADataAttributes = res.data;
      this.addedEmail = true;
      console.log(
        "typingDNADataAttributes: ",
        this.typingDNADataAttributes
      );
      this.showNotification("Ready to verify", "green");
    })
    .catch((err) => {
      console.log(err);
      this.showNotification(
        "Something went wrong when trying to verify",
        "red"
      );
    });
},
In the code above you created a method named addEmail(). This method will be called when the user submits the form on the first card.
In this method, you are using axios to send a GET request containing the user’s email to the server’s /verifyAccount endpoint to retrieve TypingDNA data attributes needed to verify the user’s typing pattern.
If the request succeeds, the TypingDNA data attributes are stored in a variable named the typingDNADataAttributes, and then you will show a notification to the user stating the application is ready to verify his account. If the request doesn’t succeed you will show a notification stating that something went wrong.
Add the following code below the addEmail() method:
async typeDNACbFn(payload) {
  console.log("call back", payload);
  let url = `${this.URL}/validateOTP`;
  if (payload.success === 1) {
    let data = {
      email: this.email,
      otp: payload.otp,
    };
    axios
      .post(url, { data: data })
      .then((res) => {
        console.log(res.data);
        if (res.data.validatedOTP.success === 1) {
          this.showNotification(
            "Typing pattern verified successfully",
            "green"
          );
          setTimeout(() => {
            this.typingPattern.verify();
            router.push({ name: "Home" });
          }, 3000);
        } else {
          this.showNotification(
            "Something went wrong when trying to verify",
            "red"
          );
        }
      })
      .catch((err) => {
        console.log(err);
        this.showNotification(
          "Something went wrong when trying to verify",
          "red"
        );
      });
  } else {
    this.showNotification(
      "Something went wrong when trying to verify",
      "red"
    );
  }
},
Here, you created a method named typeDNACbFn(). This method is the callback function that you passed to the button that will allow you to verify the user’s typing pattern. This method receives as an argument an object containing an OTP that will only be sent if TypingDNA Verify 2FA deems the user’s typing pattern correct.
In this method, you are using axios to send a POST request containing the user’s email and the OTP to the server’s /validateOTP endpoint to validate the OTP.
If OTP validation succeeds, you will first show a notification to the user stating that the user’s typing pattern was successfully verified, and then change the typingPattern store isVerified state to true. If the OTP validation or the axios request fails you will show a notification stating that something went wrong.
Your VerifyView.vue should look like the following:
<template>
  <main class="flex justify-center fixed-center">
    <div>
      <q-card v-show="!addedEmail" style="width: 50vw; height: 50vh">
        <div class="q-pt-xl" style="">
          <q-form @submit="addEmail" class="q-mx-lg">
            <p class="text-h6 text-primary">
              Enter your email to verify that you are an actual human
            </p>
            <q-input
              filled
              class=""
              v-model="email"
              label="Enter your email"
              lazy-rules
              :rules="[
                (val) => (val && val.length > 0) || 'Please type something',
                (val) =>
                  (val && val.includes('@')) || 'Please type a valid email',
              ]"
            />
            <div>
              <q-btn
                :loading="btnSaving"
                label="Save"
                type="submit"
                color="primary"
              >
                <template v-slot:loading>
                  <q-spinner-hourglass />
                </template>
              </q-btn>
            </div>
          </q-form>
        </div>
      </q-card>
      <q-card v-show="addedEmail" style="width: 50vw; height: 50vh">
        <div class="justify-center fixed-center" style="">
          <q-btn
            class="typingDNA-verify"
            color="primary"
            :data-typingdna-client-id="typingDNADataAttributes.clientId"
            :data-typingdna-application-id="
              typingDNADataAttributes.applicationId
            "
            :data-typingdna-payload="typingDNADataAttributes.payload"
            data-typingdna-callback-fn="typeDNACbFn"
          >
            Verify 2FA with TypingDNA
          </q-btn>
        </div>
      </q-card>
    </div>
  </main>
</template>

<script>
import axios from "axios";
import { useTypingPatternStore } from "@/stores/typingPattern";
import router from "@/router";
import { useQuasar } from "quasar";
export default {
  data: (vm) => ({
    typingDNADataAttributes: {},
    email: "",
    URL: import.meta.env.VITE_SERVER,
    addedEmail: false,
    showImage: false,
    btnSaving: false,
  }),
  created() {
    this.initialize();
    console.log(this.URL);
  },
  setup() {
    const $q = useQuasar();
    const typingPattern = useTypingPatternStore();
    return {
      showNotification(message, color) {
        $q.notify({
          message: message,
          color: color,
        });
      },
      typingPattern
    };
  },
  methods: {
    initialize() {
      window.typeDNACbFn = this.typeDNACbFn;
    },
    addEmail() {
      axios
        .get(`${this.URL}/verifyAccount?email=${this.email}`)
        .then((res) => {
          console.log("axios", res.data);
          this.typingDNADataAttributes = res.data;
          this.addedEmail = true;
          console.log(
            "typingDNADataAttributes: ",
            this.typingDNADataAttributes
          );
          this.showNotification("Ready to verify", "green");
        })
        .catch((err) => {
          console.log(err);
          this.showNotification(
            "Something went wrong when trying to verify",
            "red"
          );
        });
    },
    async typeDNACbFn(payload) {
      console.log("call back", payload);
      let url = `${this.URL}/validateOTP`;
      if (payload.success === 1) {
        let data = {
          email: this.email,
          otp: payload.otp,
        };
        axios
          .post(url, { data: data })
          .then((res) => {
            console.log(res.data);
            if (res.data.validatedOTP.success === 1) {
              this.showNotification(
                "Typing pattern verified successfully",
                "green"
              );
              setTimeout(() => {
                this.typingPattern.verify();
                router.push({ name: "Home" });
              }, 3000);
            } else {
              this.showNotification(
                "Something went wrong when trying to verify",
                "red"
              );
            }
          })
          .catch((err) => {
            console.log(err);
            this.showNotification(
              "Something went wrong when trying to verify",
              "red"
            );
          });
      } else {
        this.showNotification(
          "Something went wrong when trying to verify",
          "red"
        );
      }
    },
  },
};
</script>
Creating the HomeView
In this section, you will create the HomeView. This view will be where the user will be able to create and manage a list of persons.
Open the HomeView.vue file and replace the contents of the template tag with the following:
<template>
  <div class="q-pa-md">
    <q-btn label="Add Person" color="primary" class="" @click="addPerson" />
    <q-table
      title="Persons"
      dense
      class="q-mt-lg"
      :rows="rows"
      :columns="columns"
      row-key="name"
    >
      <template v-slot:body-cell-photo="props">
        <q-td :props="props">
          <img style="height:50px; width50px" :src="props.row.photo" />
        </q-td>
      </template>
      <template v-slot:body-cell-actions="props">
        <q-td :props="props">
          <q-btn flat color="green" icon="edit" @click="editItem(props.row)" />
          <q-btn
            flat
            color="red"
            icon="delete"
            @click="deleteItem(props.row)"
          />
        </q-td>
      </template>
    </q-table>
  </div>
</template>
In the block of code above, you have a button and a table to your HomeView.
The table will be where you will show the persons’ stored in the persons store .
The button above the table when clicked will open a dialog that will allow you to add new persons to the persons store.
Add the following code below your q-table tag:
<template>
  <div class="q-pa-md">
  . . .

    <q-dialog v-model="dialog" @hide="onDialogHide">
      <q-card class="formStyle">
        <q-card-section>
          <q-form @submit="save" class="q-gutter-md">
            <q-input
              filled
              v-model="editedItem.name"
              label="Enter the person's name"
              lazy-rules
              :rules="[
                (val) => (val && val.length > 0) || 'Please type something',
              ]"
            />
            <q-select
              filled
              v-model="editedItem.gender"
              :options="genders"
              label="Gender"
              :rules="[
                (val) => (val && val.length > 0) || 'Please select a gender',
              ]"
            />
            <q-file
              v-if="editedIndex === -1"
              filled
              bottom-slots
              label="Photo"
              counter
              @input="onFileSelected"
            >
              <template v-slot:prepend>
                <q-icon name="cloud_upload" @click.stop />
              </template>
              <template v-slot:append>
                <q-icon
                  name="close"
                  @click.stop="model = null"
                  class="cursor-pointer"
                />
              </template>
            </q-file>

            <img
              :style="
                showImage ? 'height: 200px; width 200px' : 'height: 0; width 0'
              "
              src=""
              ref="imgFile"
              id="imgFile"
            />

            <div>
              <q-btn
                :loading="btnSaving"
                label="Save"
                type="submit"
                color="primary"
              >
                <template v-slot:loading>
                  <q-spinner-hourglass />
                </template>
              </q-btn>
            </div>
          </q-form>
        </q-card-section>
      </q-card>
    </q-dialog>
  </div>
</template>
Here, you created a dialog containing a form where you will add the person’s name, gender, and photo.
Once this form is submitted, the person’s name, gender, photo, and an id generated by the uuid module are added to the persons store.
Replace your script tag with the following:
<script>
import { usePersonsStore } from "@/stores/persons";
import { v4 as uuidv4 } from "uuid";
import { useQuasar } from "quasar";

export default {
  data: (vm) => ({
    dialog: false,
    genders: ["Male", "Female"],
    showImage: false,
    btnSaving: false,
    columns: [
      {
        name: "id",
        required: true,
        label: "ID",
        align: "left",
        field: (row) => row.id,
        style: "max-width: 10vw",
        sortable: true,
      },
      {
        name: "name",
        required: true,
        label: "Name",
        align: "left",
        field: (row) => row.name,
        sortable: true,
      },
      {
        name: "gender",
        align: "left",
        label: "Gender",
        field: (row) => row.gender,
        sortable: true,
      },
      {
        name: "photo",
        align: "left",
        label: "Photo",
        field: (row) => row.image,
        sortable: false,
      },
      {
        name: "actions",
        align: "center",
        label: "Actions",
        field: (row) => row.id,
        sortable: false,
      },
    ],
    rows: [],
    editedIndex: -1,
    editedItem: {
      name: "",
      gender: "",
      photo: null,
    },
    defaultItem: {
      name: "",
      gender: "",
      photo: null,
    },
  }),
};
</script>
In the code above, first, you imported the persons store, the uuid module, and the useQuasar function.
After the import statements, you added the data field, where you created some standard variables that will allow you to show or hide the dialog, show the persons’ table and add a new item to the table.
Add the following code below the data field:
created() {
  this.initialize();
},
setup() {
    const $q = useQuasar();
    const personsStore = usePersonsStore();
    return {
      showNotification(message, color) {
        $q.notify({
          message: message,
          color: color,
        });
      },
      personsStore,
    };
},
In the block of code above, you added the created hook, where you are calling a method named initialize().
Below the created hook you added the setup hook. Inside this hook, first, you used the useQuasar function to access the Quasar notify plugin and create a function named showNotification() that you can use to show notifications to the user. Then you made the persons store accessible in this component.
Add the following code below the setup hook :
methods: {
  async initialize() {
    this.rows = [...this.personsStore.persons];
  },
  addPerson() {
    this.dialog = true;
    this.editedIndex = -1;
  },
  onDialogHide() {
    this.dialog = false;
    this.showImage = false;
    this.editedItem = JSON.parse(JSON.stringify(this.defaultItem));
  },
}
Here, you added the methods field, where you created the initialize(), addPerson() and onDialogHide() methods.
The initialize() method is responsible for adding the persons in the persons store to the table.
The addPerson() method is responsible for showing the dialog containing the form that you use to add a new person to the persons store, and setting the editedIndex value to -1. You need to set the editedIndex so that the application knows that you are adding a new person and not editing an existing one.
The onDialogHide() method is called when the dialog is closed and is responsible for resetting the variables used to show the form and hold the form’s data.
Add the following code below the onDialogHide() method:
onFileSelected(event) {
  console.log("input event ", event);
  var selectedFile = event.target.files[0];
  var reader = new FileReader();
  var imgTag = document.getElementById("imgFile");
  console.log("imgTag", imgTag);
  let vm = this;
  reader.onload = function (e) {
    imgTag.src = e.target.result;
    vm.editedItem.photo = e.target.result;
  };
  reader.readAsDataURL(selectedFile);
  this.showImage = true;
},
editItem(item) {
  this.editedIndex = this.rows.indexOf(item);
  this.editedItem = Object.assign({}, item);
  this.dialog = true;
},
In the code above, you added the onFileSelected() and editItem() method to the methods field.
The onFileSelected() method is responsible for showing in the form the person’s photo that the user selected, and adding this photo as a base64 string to the object holding the form’s data.
The editItem() method is responsible for assigning the select person’s data to the object holding the form’s data and showing the dialog.
Add the following code below the editItem() method:
async save() {
  if (this.editedIndex === -1) {
    this.btnSaving = true;
    console.log("saving");
    console.log(this.editedItem);
    let label = this.editedItem.name;
    let person = {
      id: uuidv4(),
      name: label,
      photo: this.editedItem.photo,
      gender: this.editedItem.gender,
    };
    this.personsStore.addPerson(person);
    this.rows.push(person);
    this.btnSaving = false;
    this.dialog = false;
    this.showNotification("Person added successfully", "green");
  } else {
    Object.assign(this.rows[this.editedIndex], this.editedItem);
    this.personsStore.editPerson(this.editedItem);
    this.showNotification("Person edited successfully", "green");
    this.btnSaving = false;
    this.dialog = false;
  }
},
In the block of code above, you added a method named save() to the methods field.
The save() method is responsible for adding a new person to the persons store or editing an existing one. Once it adds or edits a person it will show a notification stating that the operation was successful.
Add the following code below the save() method:
async deleteItem(item) {
  console.log("delete", item);
  const index = this.rows.indexOf(item);
  confirm("Are you sure you want to remove this person from the list?")   && (await this.personsStore.removePerson(item.id));
  this.rows.splice(index, 1);
  this.showNotification("Person removed successfully", "green");
},

Here, you added a method named deleteItem() to the methods field.

The deleteItem() method is responsible for removing an item from the persons store and table, and then showing a notification stating that the operation was successful.

Add the following style tag below your script tag:

<style scoped>
.formStyle {
  width: 70vw;
  height: 70vh;
}
</style>
In the code above you have added a class named formStyle that will be used to set the card containing the form width and height.
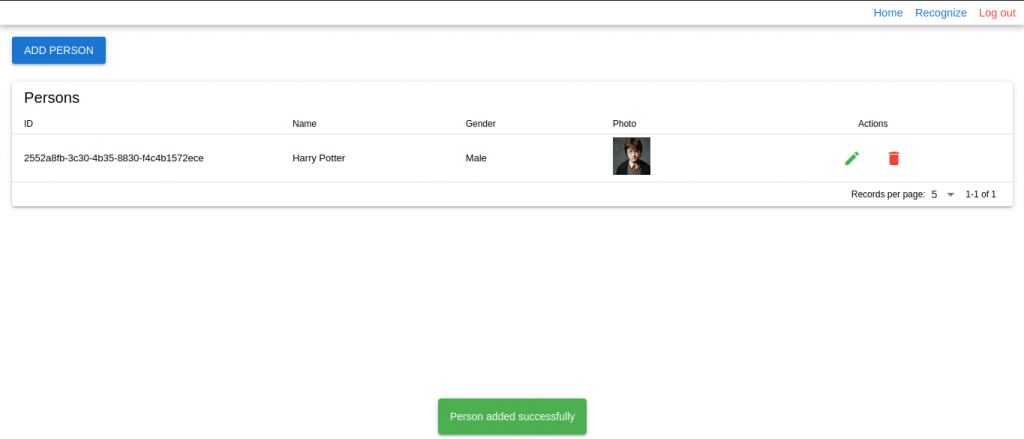
Your HomeView should look like the following after adding a person to the persons store:
Your HomeView.vue file should look like the following:
<template>
  <div class="q-pa-md">
    <q-btn label="Add Person" color="primary" class="" @click="addPerson" />
    <q-table
      title="Persons"
      dense
      class="q-mt-lg"
      :rows="rows"
      :columns="columns"
      row-key="name"
    >
      <template v-slot:body-cell-photo="props">
        <q-td :props="props">
          <img style="height:50px; width50px" :src="props.row.photo" />
        </q-td>
      </template>
      <template v-slot:body-cell-actions="props">
        <q-td :props="props">
          <q-btn flat color="green" icon="edit" @click="editItem(props.row)" />
          <q-btn
            flat
            color="red"
            icon="delete"
            @click="deleteItem(props.row)"
          />
        </q-td>
      </template>
    </q-table>
    <q-dialog v-model="dialog" @hide="onDialogHide">
      <q-card class="formStyle">
        <q-card-section>
          <q-form @submit="save" class="q-gutter-md">
            <q-input
              filled
              v-model="editedItem.name"
              label="Enter the person's name"
              lazy-rules
              :rules="[
                (val) => (val && val.length > 0) || 'Please type something',
              ]"
            />
            <q-select
              filled
              v-model="editedItem.gender"
              :options="genders"
              label="Gender"
              :rules="[
                (val) => (val && val.length > 0) || 'Please select a gender',
              ]"
            />
            <q-file
              v-if="editedIndex === -1"
              filled
              bottom-slots
              label="Photo"
              counter
              @input="onFileSelected"
            >
              <template v-slot:prepend>
                <q-icon name="cloud_upload" @click.stop />
              </template>
              <template v-slot:append>
                <q-icon
                  name="close"
                  @click.stop="model = null"
                  class="cursor-pointer"
                />
              </template>
            </q-file>
            <img
              :style="
                showImage ? 'height: 400px; width 400px' : 'height: 0; width 0'
              "
              src=""
              ref="imgFile"
              id="imgFile"
            />
            <div>
              <q-btn
                :loading="btnSaving"
                label="Save"
                type="submit"
                color="primary"
              >
                <template v-slot:loading>
                  <q-spinner-hourglass />
                </template>
              </q-btn>
            </div>
          </q-form>
        </q-card-section>
      </q-card>
    </q-dialog>
  </div>
</template>
<script>
import { usePersonsStore } from "@/stores/persons";
import { v4 as uuidv4 } from "uuid";
import { useQuasar } from "quasar";
export default {
  data: (vm) => ({
    dialog: false,
    genders: ["Male", "Female"],
    showImage: false,
    btnSaving: false,
    columns: [
      {
        name: "id",
        required: true,
        label: "ID",
        align: "left",
        field: (row) => row.id,
        style: "max-width: 10vw",
        sortable: true,
      },
      {
        name: "name",
        required: true,
        label: "Name",
        align: "left",
        field: (row) => row.name,
        sortable: true,
      },
      {
        name: "gender",
        align: "left",
        label: "Gender",
        field: (row) => row.gender,
        sortable: true,
      },
      {
        name: "photo",
        align: "left",
        label: "Photo",
        field: (row) => row.image,
        sortable: false,
      },
      {
        name: "actions",
        align: "center",
        label: "Actions",
        field: (row) => row.id,
        sortable: false,
      },
    ],
    rows: [],
    editedIndex: -1,
    editedItem: {
      name: "",
      gender: "",
      photo: null,
    },
    defaultItem: {
      name: "",
      gender: "",
      photo: null,
    },
  }),
  created() {
    this.initialize();
  },
  setup() {
    const $q = useQuasar();
    const personsStore = usePersonsStore();
    return {
      showNotification(message, color) {
        $q.notify({
          message: message,
          color: color,
        });
      },
      personsStore,
    };
  },
  methods: {
    async initialize() {
      this.rows = [...this.personsStore.persons];
    },
    addPerson() {
      this.dialog = true;
      this.editedIndex = -1;
    },
    onDialogHide() {
      this.dialog = false;
      this.showImage = false;
      this.editedItem = JSON.parse(JSON.stringify(this.defaultItem));
    },
    onFileSelected(event) {
      console.log("input event ", event);
      var selectedFile = event.target.files[0];
      var reader = new FileReader();
      var imgTag = document.getElementById("imgFile");
      console.log("imgTag", imgTag);
      let vm = this;
      reader.onload = function (e) {
        imgTag.src = e.target.result;
        vm.editedItem.photo = e.target.result;
      };
      reader.readAsDataURL(selectedFile);
      this.showImage = true;
    },
    editItem(item) {
      this.editedIndex = this.rows.indexOf(item);
      this.editedItem = Object.assign({}, item);
      this.dialog = true;
    },
    async save() {
      if (this.editedIndex === -1) {
        this.btnSaving = true;
        console.log("saving");
        console.log(this.editedItem);
        let label = this.editedItem.name;
        let person = {
          id: uuidv4(),
          name: label,
          photo: this.editedItem.photo,
          gender: this.editedItem.gender,
        };
        this.personsStore.addPerson(person);
        this.rows.push(person);
        this.btnSaving = false;
        this.dialog = false;
        this.showNotification("Person added successfully", "green");
      } else {
        Object.assign(this.rows[this.editedIndex], this.editedItem);
        this.personsStore.editPerson(this.editedItem);
        this.showNotification("Person edited successfully", "green");
        this.btnSaving = false;
        this.dialog = false;
      }
    },
    async deleteItem(item) {
      console.log("delete", item);
      const index = this.rows.indexOf(item);
      confirm("Are you sure you want to remove this person from the list?") &&
        (await this.personsStore.removePerson(item.id));
      this.rows.splice(index, 1);
      this.showNotification("Person removed successfully", "green");
    },
  },
};
</script>


<style scoped>
.formStyle {
  width: 70vw;
  height: 70vh;
}
</style>
Building the client application to production and starting the server
In this section, you will build the client application for production, copy the dist directory to the server directory, start the server application.
Go back to your first terminal window, and navigate to the root directory of your client application:
cd ../..Create a file named .env and inside it store your Ngrok https URL:
VITE_SERVER="YOUR_NGROK_HTTPS_URL"Now, build your client application for production:
npm run buildCopy your client application bundle to the server application root directory:
cp -r dist ../serverNavigate to the server directory and start the server application:
cd ../server
node server.js
Open your browser and navigate to your Ngrok https URL and you should see the following:
Conclusion
In this tutorial, first, you learned how to use TypingDNA Verify 2FA to secure a Vue 3 application, and then you learned how to use Quasar and Pinia to add CRUD functionality to your application. For more information on how to use TypingDNA Verify 2FA make sure you read the TypingDNA Verify 2FA Documentation.